CFMRI BIDS conversion script cfmridcm2bids
About the cfmridcm2bids
The cfmridcm2bids is a script that helps the center’s users to convert their dicom data to the Brain Imaging Data Structure (BIDS) format. It collects scan information, creates a BIDS configuration file (or uses an existing BIDS configuration file), converts the dataset to BIDS format using dcm2bids and transfers the data to the target directory on any one of the center’s servers.
Prerequisites for using cfmridcm2bids
Currently, the script can only take the dicom files output by the Prisma scanner. Also, in order to create the BIDS configuration file, the script identifies different MRI scans by unique codes.
Attention
If you already have a BIDS configuration file, you can skip the remainder of the Prerequisites section and go to Start the cfmridcm2bids section.
The table below lists the MRI scans supported and their codes.
scan type |
code |
comment |
|---|---|---|
fMRI PA |
_f1 |
The fMRI runs with PA phase encoding direction. (the most common fMRI runs) |
fMRI AP |
_f2 |
The fMRI runs with AP phase encoding direction. (uncommon, but sometimes used in official HCP protocols) |
topup PA |
_tp1 |
The topup scan with PA phase encoding direction. |
topup AP |
_tp2 |
The topup scan with AP phase encoding direction. |
t1 struc |
_s1 |
The T1-weighted structural scan. |
t2 struc |
_s2 |
The T2-weighted structural scan. |
dti PA |
_d1 |
The DTI scan with PA phase encoding direction. |
dti AP |
_d1 |
The DTI scan with AP phase encoding direction. |
There are two possible options to add the codes to your MRI scans. First, as shown in the image below, you can add the codes to the end of your scans in the ‘Program Editor’ on the Prisma scanner. But apparently, the first option only works for the data that has not been collected.

For the users who want to use the script to convert existing datasets, the second option is to add the scan type codes to the names of the folders where the raw dicom files of your scans are saved. For example, the figure below shows an existing dataset without the scan type codes.
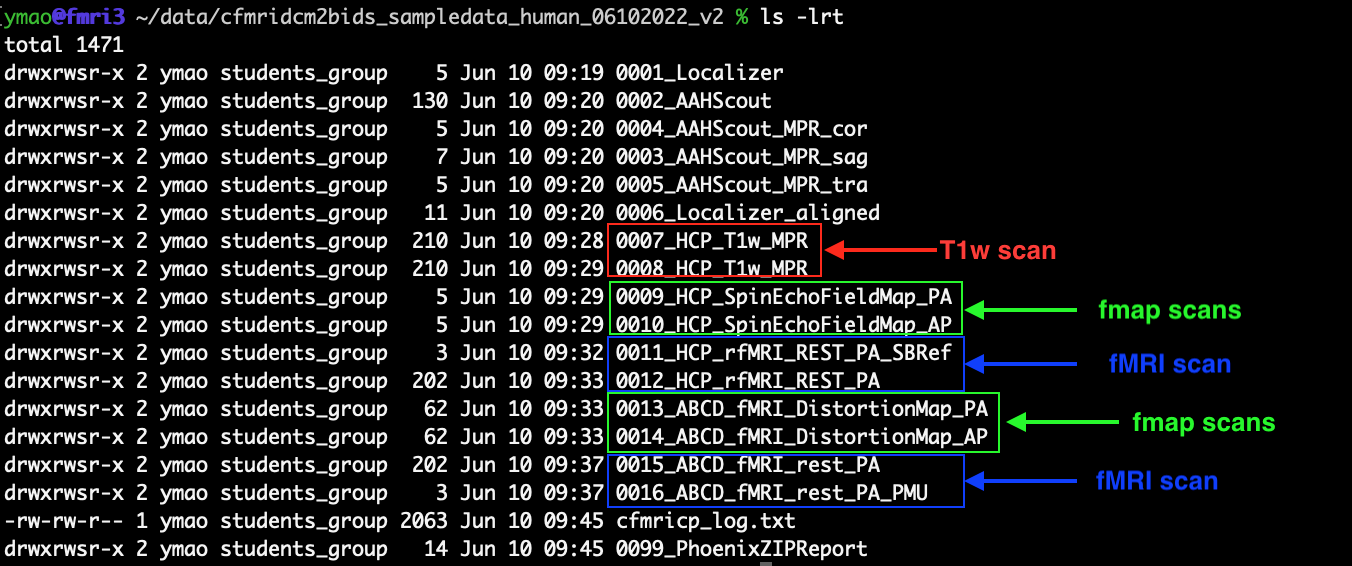
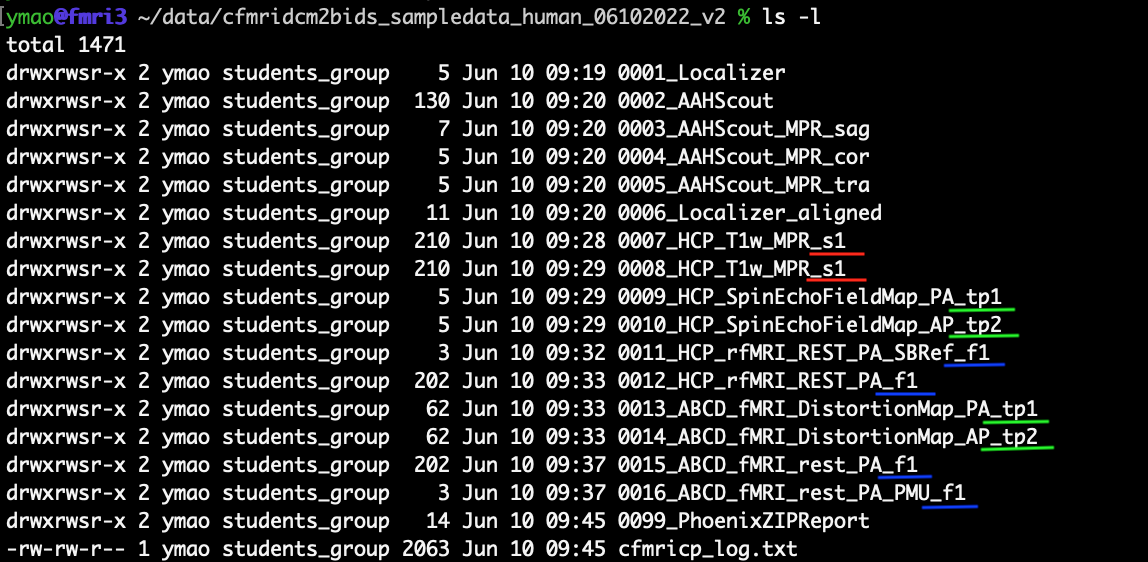
Here we have one T1w structure scan, four topup scans (or named the fieldmap scans) and two fMRI scans. For the T1w structure scan, we add the scan type code ‘_s1’ at the end of the folders ‘0007_HCP_T1w_MPR’ and ‘0008_HCP_T1w_MPR’ by using the following command
mv 0007_HCP_T1w_MPR 0007_HCP_T1w_MPR_s1
mv 0008_HCP_T1w_MPR 0008_HCP_T1w_MPR_s1
Similarly, we add the scan type codes to other scans. The figure below shows the dataset after adding the scan type codes.
Start the cfmridcm2bids
In the section, we will go through how to use the script with explanations and examples.
Step 1 - start the script
On most of the center’s servers, you can start the script by entering ‘startbids’ in the command line. After entering the ‘startbids’, you should see a welcome message as shown in the figure below
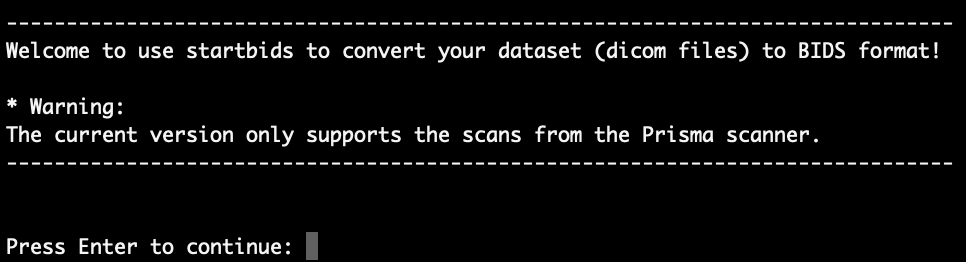
Press Enter to continue.
Step 2 - select the input and output folders
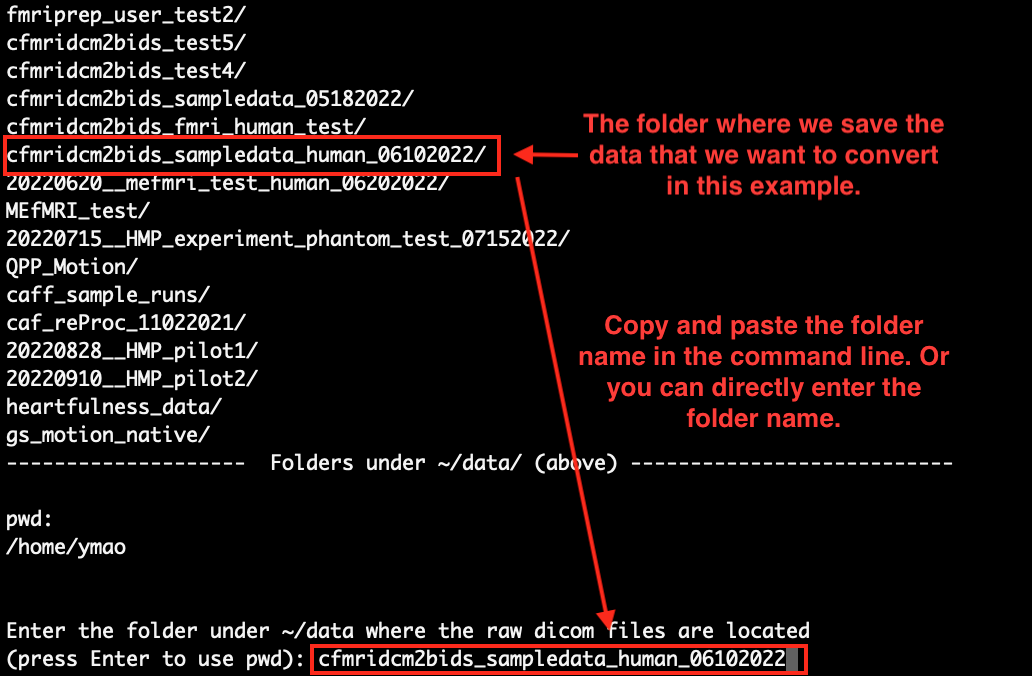
After pressing Enter from step 1, you will see a list of folders under ‘~/data/’. Copy and paste the name of the folder where the data you want to convert is stored. Here, as an example, we want to convert the data stored in the folder ‘cfmridcm2bids_sampledata_human_06102022’, we just copied and pasted its name in the command line:
Press Enter to continue.
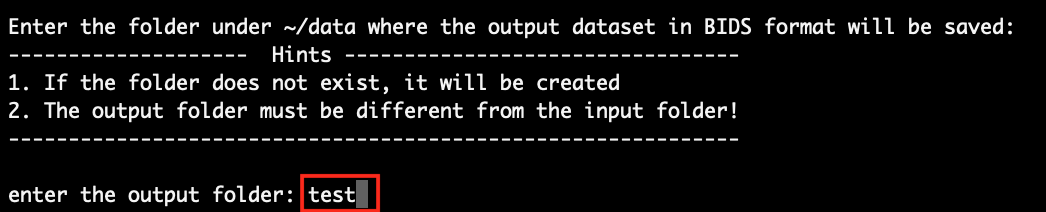
Next, you will need to enter the name of the folder where you want to save the data after BIDS conversion. It can be an existing folder with some data in it, but it can not be the input folder. As an example, we just name the output folder as ‘test’ (please pick a better name for your dataset!). As a result, the data after converting to BIDS will be saved at ‘~/data/test/’.
Press Enter to continue.
Then, as a sanity check, the full paths of the input and output directories are displayed. In the example, what we see is:
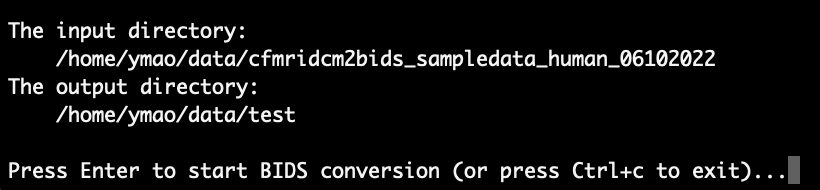
Please take a look at them and make sure that there is no typo. After confirming that everything looks fine, press Enter to continue. Then, MATLAB will automatically open (it can take a while) for the next steps.
Step 3 - enter subject and session info
After MATLAB is opened in step 2, the script will first ask for the ‘SubjectCode’ of the scan session that is currently converting. You should see something like this:
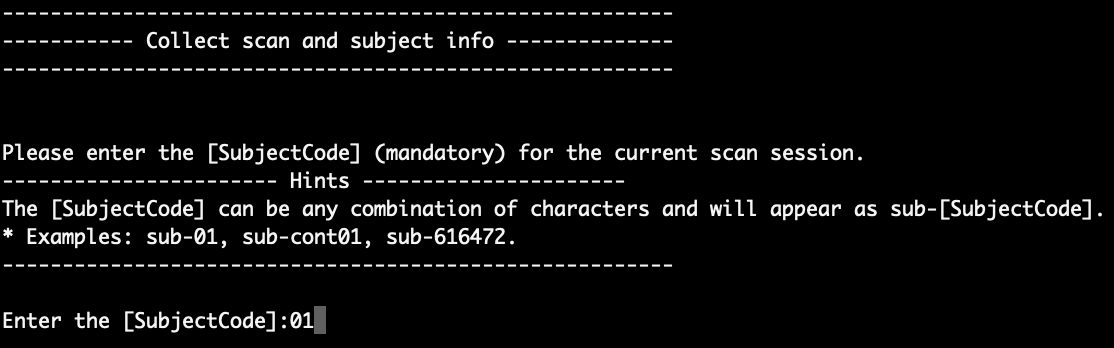
Here, we put ‘01’ as the subject code. Press Enter to continue. Then, the script will ask you for the ‘SessionCode’, as shown in the figure below:

Normally, if there are multiple scan sessions for each subject and scan sessions need to be differentiated, we would recommend using the ‘SessionCode’. For example, you can use ‘cont’ for the control session and ‘treat’ for the treatment session. If there is only one scan session or you don’t need the ‘SessionCode’, you can just press Enter without entering anything in the command line to skip it. In this example, we put ‘01’ as the session code.
Step 4 - create the BIDS configuration file
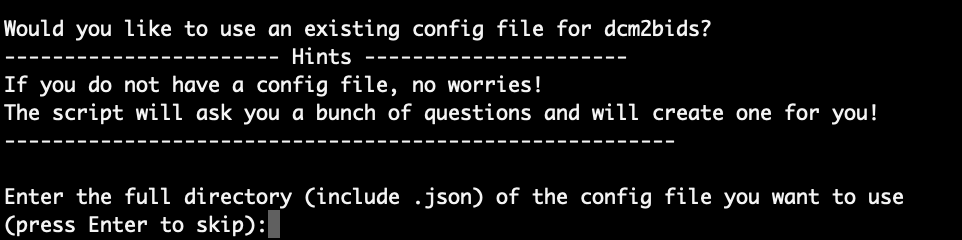
After entering the subject and session info in step 3, the next step is to generate the BIDS configuration file. The script will first ask if there is an existing BIDS configuration file that can be used:
Attention
If you would like to use an existing BIDS configuration file here, you are responsible for the correctness of the configuration file, as the script will not check that for you.
Here, we press Enter to let the script create the configuration file for us. As mentioned in the ‘Hints’ block, there will be a bunch of questions that need to be answered. Let’s go through the questions together.
Step 4.1 - exclude scans
First, the script lists the scans identified and asks if any scans need to be excluded:
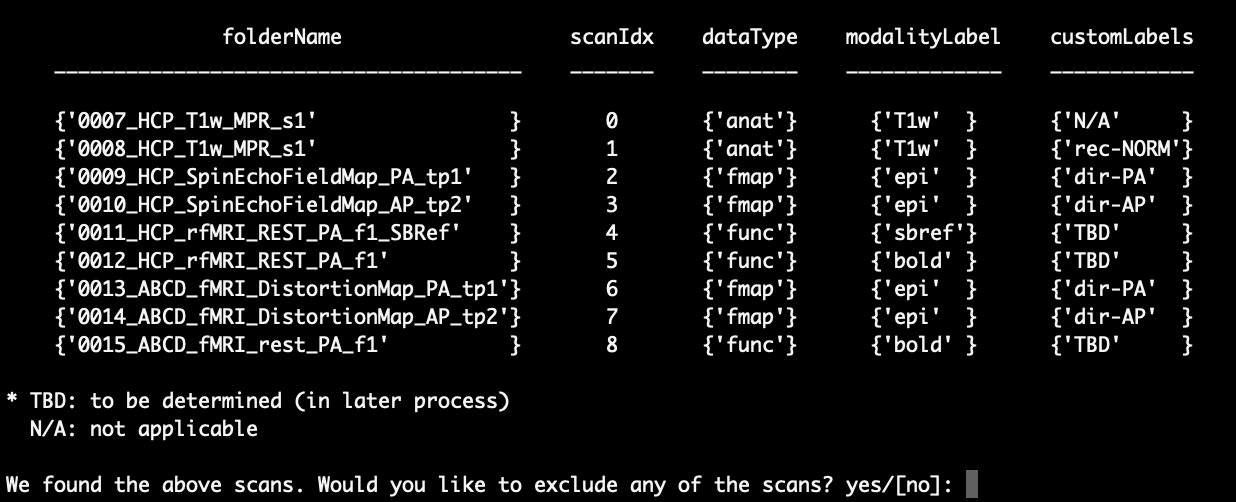
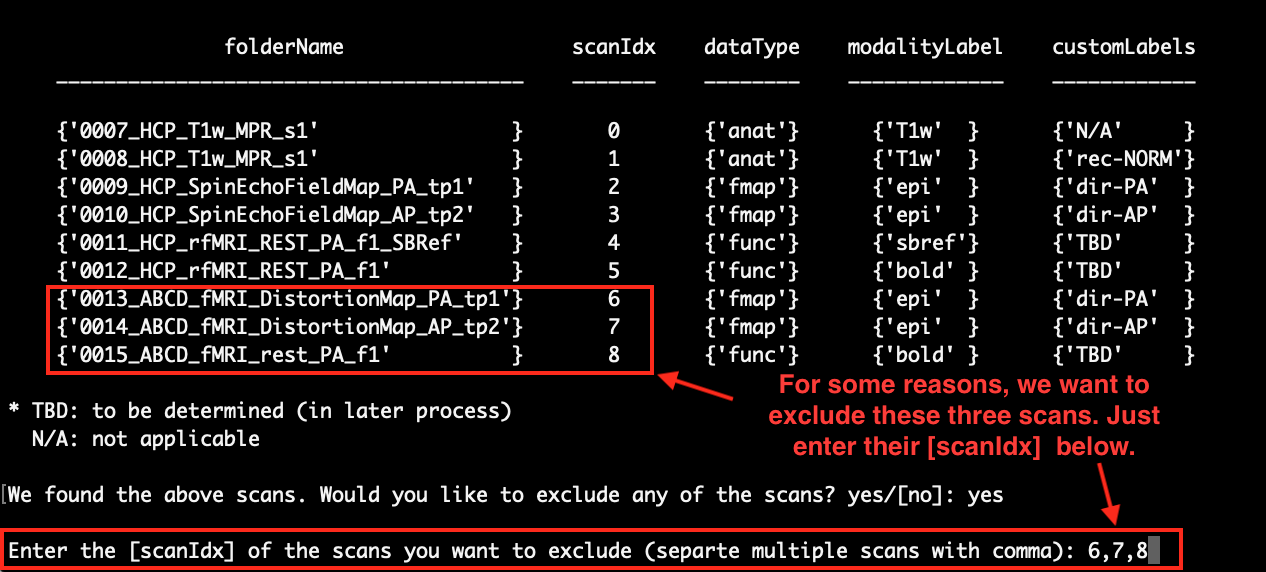
If there is nothing wrong with any of your scans, you can enter ‘no’ or just press Enter to select the default option ‘[no]’. Here, we enter ‘yes’ and show you how to exclude scans. After typing ‘yes’ in the command line and pressing Enter, you will see that a new line pops up and asks for the ‘scanIdx’ of the scans that you want to exclude. As an example, we exclude scans 6, 7 and 8 as follows:
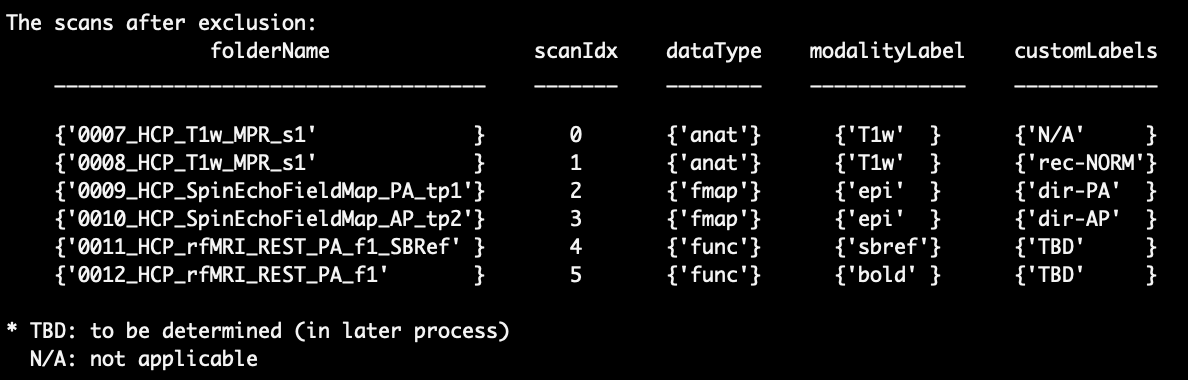
After excluding those scans, the list of scans will be updated and the excluded scans are no longer on the list
Step 4.2 - check scan info
In this step, the script asks you if the scans and the related info are correct. Please check if all the scans that you want to be converted are listed and if the ‘dataType’, ‘modalityLabel’ and ‘customLabels’ are correct for each scan. If you find any mistakes or scans are missing, please contact Aaron (ajacobson@health.ucsd.edu) or Conan (coc004@health.ucsd.edu ) for help. If everything looks fine, enter ‘yes’ or press Enter to continue.
Step 4.3 - collect extra info for functional and fieldmap scans
If there are functional or fieldmap scans in the scan session you are converting, the script will identify them and ask for more information from you:

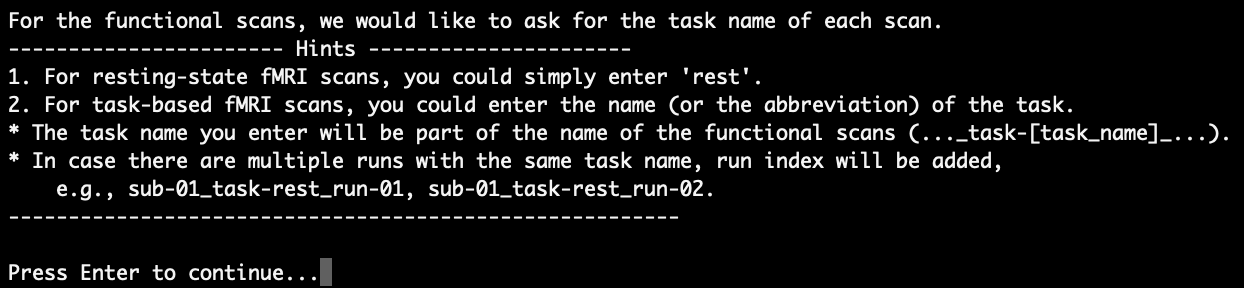
If there is any functional data, the script is going to ask for the task name for each functional scan. First, a ‘Hints’ block about how to determine the task name pops up:
After pressing Enter to continue, the functional scans are listed and you will be asked to enter the task name for each of them sequentially. As an example, we say that the first scan is the resting-stats scan, and the second scan is the finger-tapping task scan. Hence, we enter ‘rest’ for the first scan and enter ‘FT’ (short for finger tapping) for the second scan:
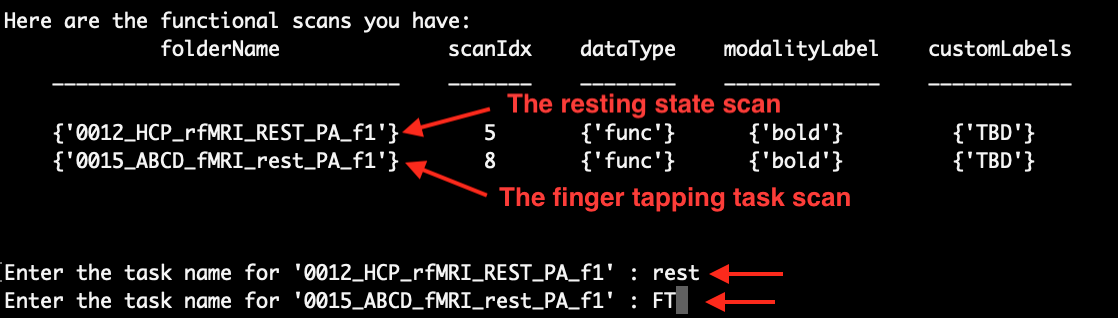
After entering the task names, the script will let you confirm the task names you entered:
You can either enter ‘no’ to re-type the task names or enter ‘yes’ to continue.
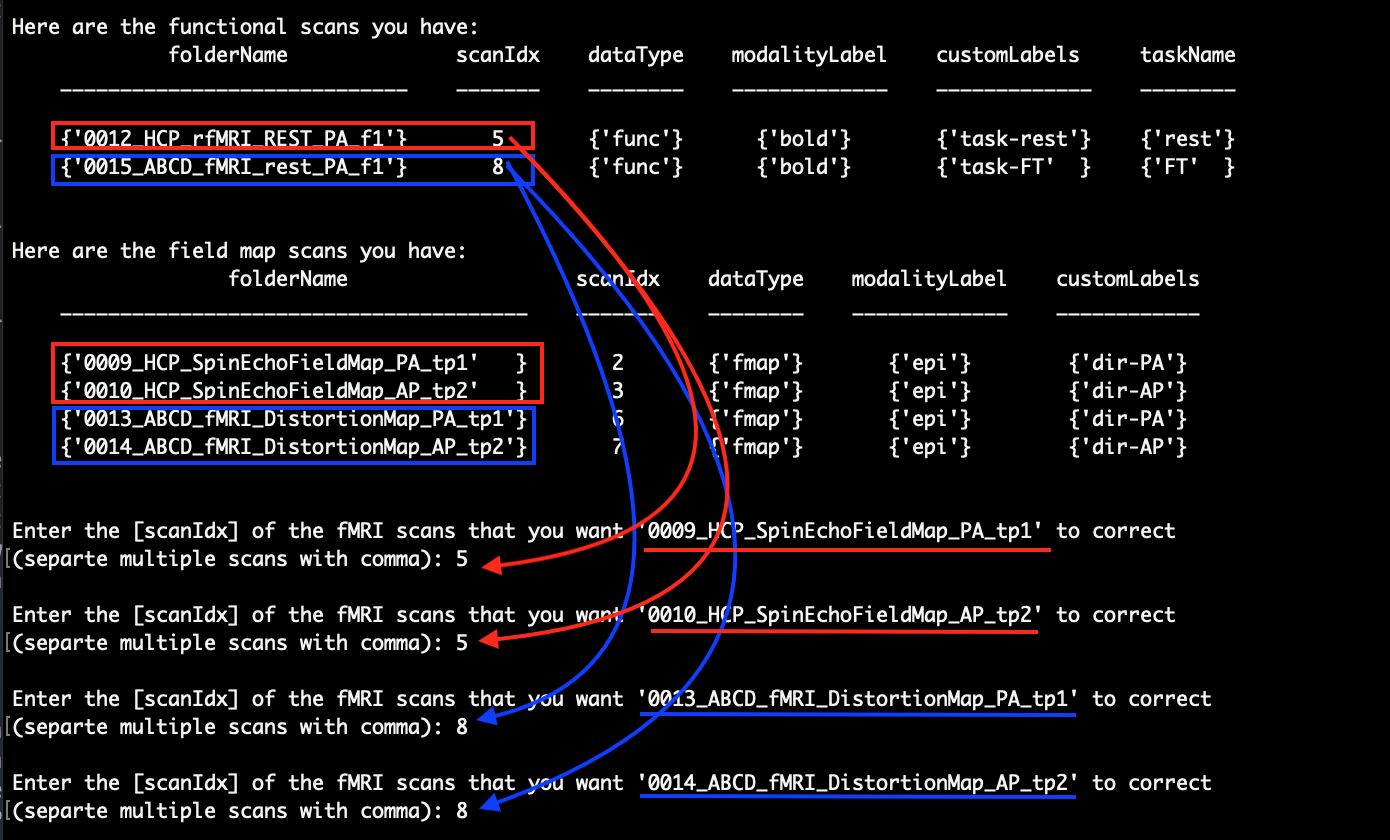
After you are done entering the task names of the functional scans, the script is going to ask for information about the field maps scans, if there are any. As the fieldmap scans are normally used to correct for susceptibility distortion in the functional data, the scrip would like to know which fMRI scans you want each of the fieldmap scans to correct:

After pressing Enter to continue, the functional scans and the fieldmap scans will be listed and you are asked to enter the ‘scanIdx’ of the fMRI scans that you want each of the fieldmap scans to correct sequentially. As an example, we would like to use ‘0009_HCP_SpinEchoFieldMap_PA_tp1’ and ‘0010_HCP_SpinEchoFieldMap_AP_tp2’ to correct for ‘0012_HCP_rfMRI_REST_PA_f1’ and use ‘0013_ABCD_fMRI_DistortionMap_PA_tp1’ and ‘0014_ABCD_fMRI_DistortionMap_AP_tp2’ to correct for ‘0015_ABCD_fMRI_rest_PA_f1’:
After that, the script will ask you to check for the information that you just entered:
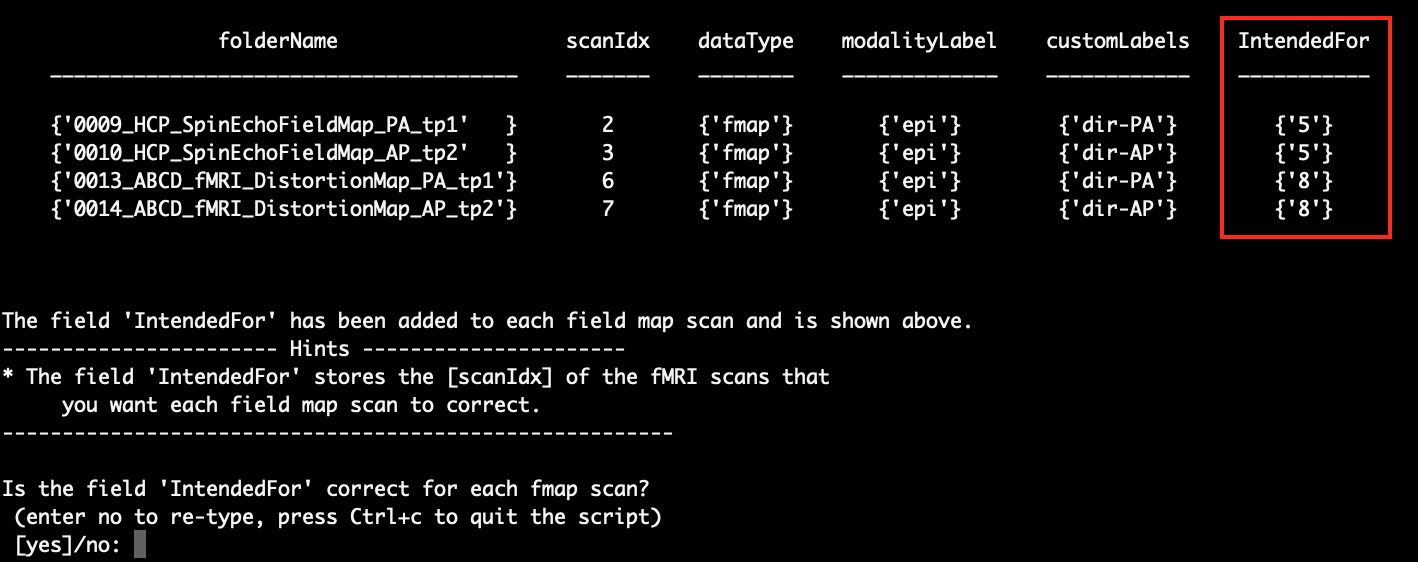
Again, you can either enter ‘no’ to re-type or enter ‘yes’ to continue.
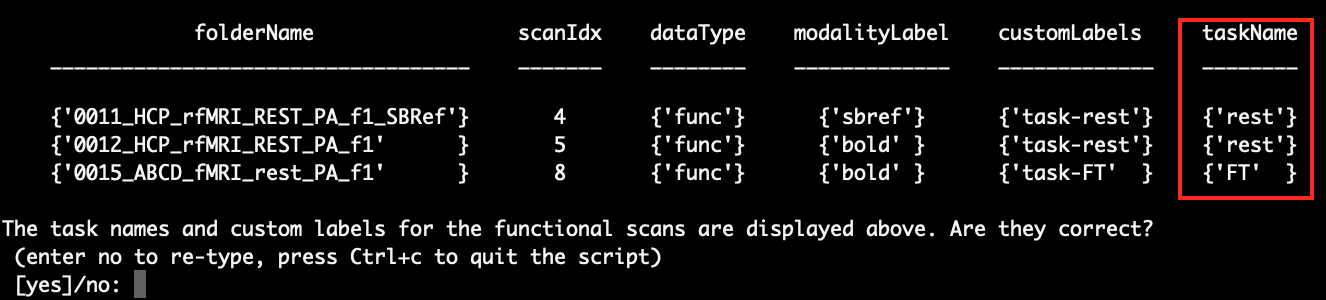
Step 4.4 - final check on the scan info
In this step, the scans and the related info that will be converted will be listed again. If there are functional scans and field map scans in your scan session, you will see the field ‘taskName’ for the functional scans and the field ‘IntendedFor’ for the field map scans. Also, the field ‘customaLabels’ for the fMRI scans has been updated to reflect the ‘taskName’.
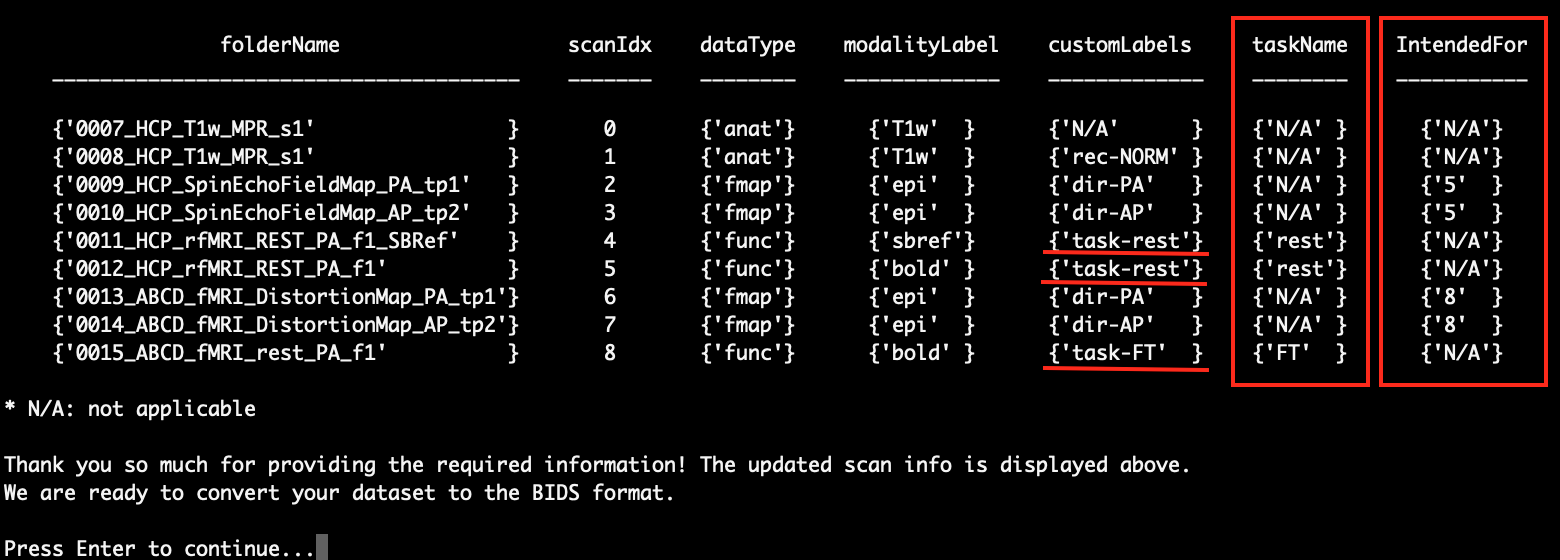
If you find everything is correct, you can press Enter to continue. Otherwise, you can press ‘Ctrl+C’ to exit the script.
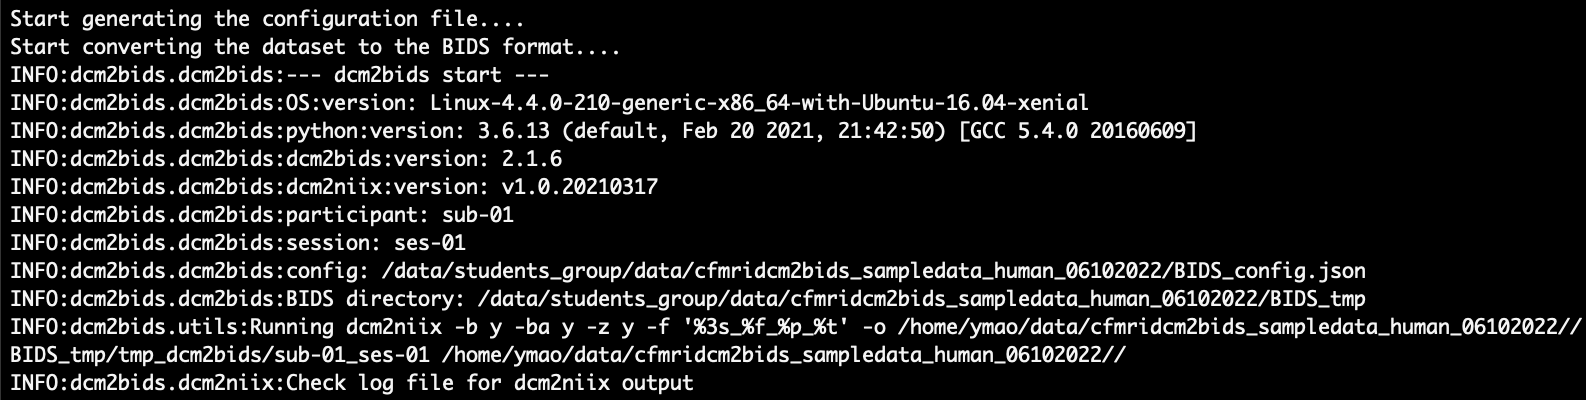
Step 4.5 - create the BIDS configuration file and convert the data to BIDS format
In this step, the script automatically creates a BIDS configuration file and uses ‘dcm2bids’ to convert your scan session to BIDS format. While ‘dcm2bids’ is running, you should see something like this:
After it’s done, you will see the message below:

Step 5 - transfer the data
At last, the script will transfer your scan session in BIDS format to the output directory you entered in step 2. Nothing you need to do in this step, just have a cup of coffee and relax. After the transfer is done, you should see something like this:
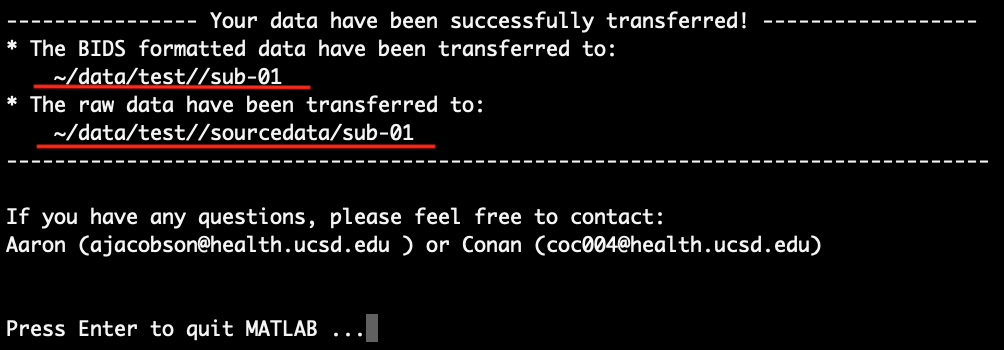
It is worth noting that the BIDS configuration file named ‘BIDS_config.json’ is also transferred to the raw data directory, i.e. ‘~/data/test/sourcedata/sub-01/’ in this example. Finally, press Enter to quit the script and quit MATLAB.
Step 6 - sanity checks on the data after conversion
We would like to recommend you check the data after converting the BIDS format. Simply looking at the raw data and checking if all the scans are there in the right folder would be very useful. Also, you can use bids-validator on your dataset.
Questions and suggestions
If you have any questions or find any mistakes or would like to give us some suggestions to improve the script, please feel free to send an email to Aaron (ajacobson@health.ucsd.edu) or Conan (coc004@health.ucsd.edu). Your feedback is appreciated.
Useful links
Check out this amazing BIDS tutorial in Andy’s Brain Book here. We learned a lot from it when we write the script. It is easy to understand and can be the best starting point if you want to know more about BIDS!