Navigating & Interacting with Multiband Data Effectively at CFMRI
The current multiband protocols at CFMRI require extra attention to the resulting data in order effectively acquire, store, and process your images.
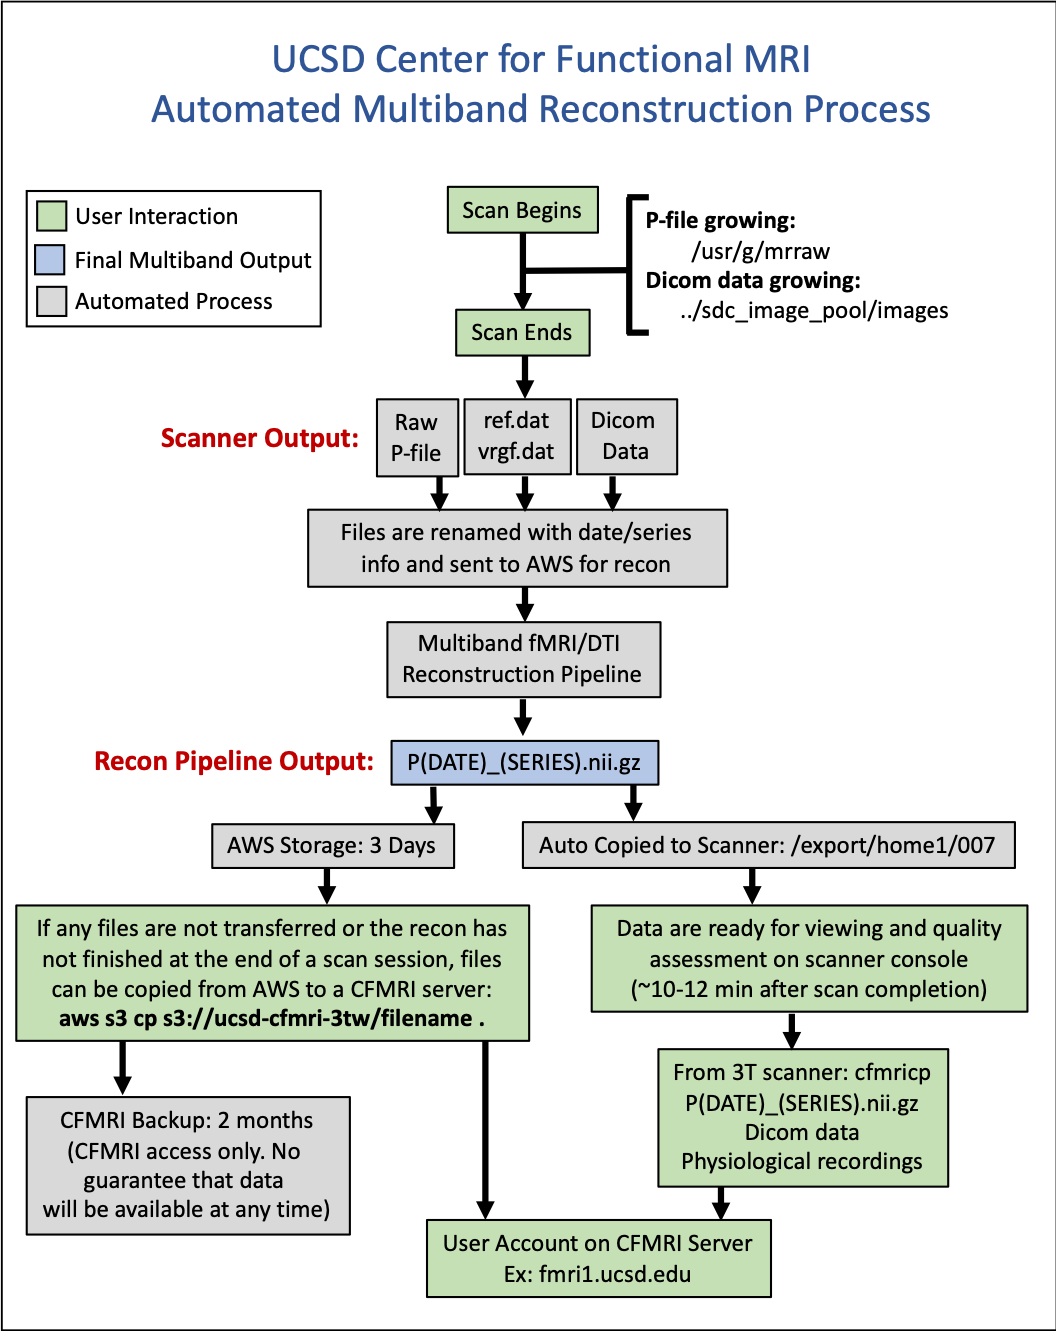
Automated Multiband Reconstruction Process

Basic Description of the Multiband Reconstruction Process
Data are acquired on the scanner
Specific files are sent to Amazon Web Services (AWS) automatically and the end of each multiband acquisition
pfile (raw k-space data)
ref.dat & vrfg.dat files
1 dicom file (used to copy Rx info)
Reconstruction code is run in AWS to generate a nii.gz (nifti) file based on your scan data
The nii.gz file is sent back to the scanner and is available for viewing on the scanner (using AFNI) in:
/export/home1/007
From the time your scan ends, to the time the nii.gz file returns to the scanner is typically between 10-15 minutes
This is a significant improvement from the previous method in which users were required to store and reconstruct the raw data themselves (6-12 hours and many manual steps)
What You Need to Know as a Scanner Operator
Given the delay (10-15 min) between the completion of a scan and the return of the reconstructed nii.gz file to the scanner, the reconstructed images from the last 1-2 of your scans from your session may not have had time to return to the scanner at the conclusion of your session
This means that the typical process of using “cfmricp” to transfer data to your account on one of the CFMRI maintained servers might not grab your complete dataset for the session
All dicom & physio files will be included in the cfmricp transfer, and it is likely that you will have almost all of your nii.gz (multiband recon files)
It is absolutely crtiitcal that you confirm the existance of all expected nii.gz files in the cfmricp log and make a note of any multiband files that have not returned to the scanner at the end of your session
Any missing nii.gz files will need to be pulled from AWS after returning to your lab. You have a window of ~3 days to pull any missing files to your account on one of the CFMRI supported servers
Instructions for Viewing and Pulling Data from AWS
The following commands are designed to be run from your account on one of the CFMRI supported servers (not from the scanner in most cases)
To view available files from CFMRI AWS buckets
cfmriawsls ucsd-cfmri-3tw

cfmriawsls ucsd-cfmri-3te

aws s3 ls s3://ucsd-cfmri-spfg
To copy a file to your current directory
Update the name of the file to match the file you need to pull
Update the bucket (3te, 3tw, spfg) you want to pull from
aws s3 cp s3://ucsd-cfmri-3tw/P0515_104731_fMRI_mux8_2mm_mbrecon.nii.gz .

aws s3 cp s3://ucsd-cfmri-3te/P0515_104731_fMRI_mux8_2mm_mbrecon.nii.gz .

aws s3 cp s3://ucsd-cfmri-spfg/P0515_104731_fMRI_mux8_2mm_mbrecon.nii.gz .
To search specifically for your scan files
Update the date and time (this example is looking for files from May 24th around 12 pm)
cfmriawsls ucsd-cfmri-3tw  | grep P0524_12

cfmriawsls ucsd-cfmri-3te  | grep P0524_12

aws s3 ls s3://ucsd-cfmri-spfg | grep 0918_14
To copy all your reconstructed nii.gz files
aws s3 cp --recursive s3://ucsd-cfmri-3tw  . --exclude "*" --include "*P0524_12*.nii.gz"

aws s3 cp --recursive s3://ucsd-cfmri-3te  . --exclude "*" --include "*P0524_12*.nii.gz"

aws s3 cp --recursive s3://ucsd-cfmri-spfg . --exclude "*" --include "*0918_1447_38_e*"
Auto-Recon Failures
Every once in a while there is a glitch in this system and your data does not reconstruct and return to the scanner
During the daily morning QA, we look for failed recons and attempt to re-run the process
If you notice that a reconstructed nii.gz file is missing from your session AND from AWS an hour or more after your scan completes, please check AWS (using the commands above) on the following business day
If we (CFMRI staff) notice the failed recon from the previous day and re-run the process, the file should be available to pull from AWS without reaching out to CFMRI staff or re-running the recon yourselves
Rarely, there is an issue with the recon that requires manual intervention. If you are missing a nii.gz after your scan and you do not see it in AWS within 24 hours of acquisition, please email:
Aaron Jacobson ajacobson@ucsd.edu | Conan Chen coc004@ucsd.edu
IMPORTANT: If any files are missing for more than 90 days and are not reported to CFMRI, it is nearly impossible to re-create the nii.gz file.
Manually reconstructing your data on fmri1, fmri2, or fmri3
Occasionally, you may need to re-run a reconstruction through the standard multiband recon pipeline
There is a method set up for you to run this from within your own account on fmri1, fmri2, or fmri3
Example:
P1025_1520_32_DTI_pe0__dmb01.7
If the p-file listed above never reconstructed into a nii.gz or there was an issue with the recon and you needed to re-run it:
Log into the appropriate server
ssh -Y [email protected] (or fmri2, fmri3)
Navigate to the directory containing the rest of the data from the session
cd ~/data/SubjectID
Pull all associated files to your current location (pfile.7, ref.dat, vrgf.dat, .dcm)
Using the wildcard (*) as listed in the code below will ensure you grab all the appropriate files
aws s3 cp --recursive s3://ucsd-cfmri-3tw . --exclude "*" --include "*P1025_1520_32_DTI_pe0__dmb01*"
Run the manual reconstruction wrapper script
manual_recon_fmri3
Follow the prompts
Do NOT include the .7 on the pfile name when it asks for it
Z-Stretched Reconstructions
As an operator at CFMRI, you have probably noticed the warning on the desk stating:
“Multi-Band Users: Wait for scan status to update from “SCND” to “Done” before beginning the next scan”
Most of you are probably aware of this but may not know exactly why this is required, or what the consequences will be if you move on too soon to the subsequent scan
Why does this happen?
The reconstruction process outlined above is complex and involves a lot of the CPU resources to run
The first action behind the scenes when your scan finishes is generating a copy of a single dicom file from your scan and moving it to another location on the system
This process is quick, but if your p-file has not finished growing before you start your next scan, by the time the recon process makes a copy of the most recent dicom file, this file no longer belongs to your previous scan (the one that is being sent to AWS for reconstruction!)
Instead, a single dicom from the next scan (which has already started running) is copied and sent along with your p-file and .dat files
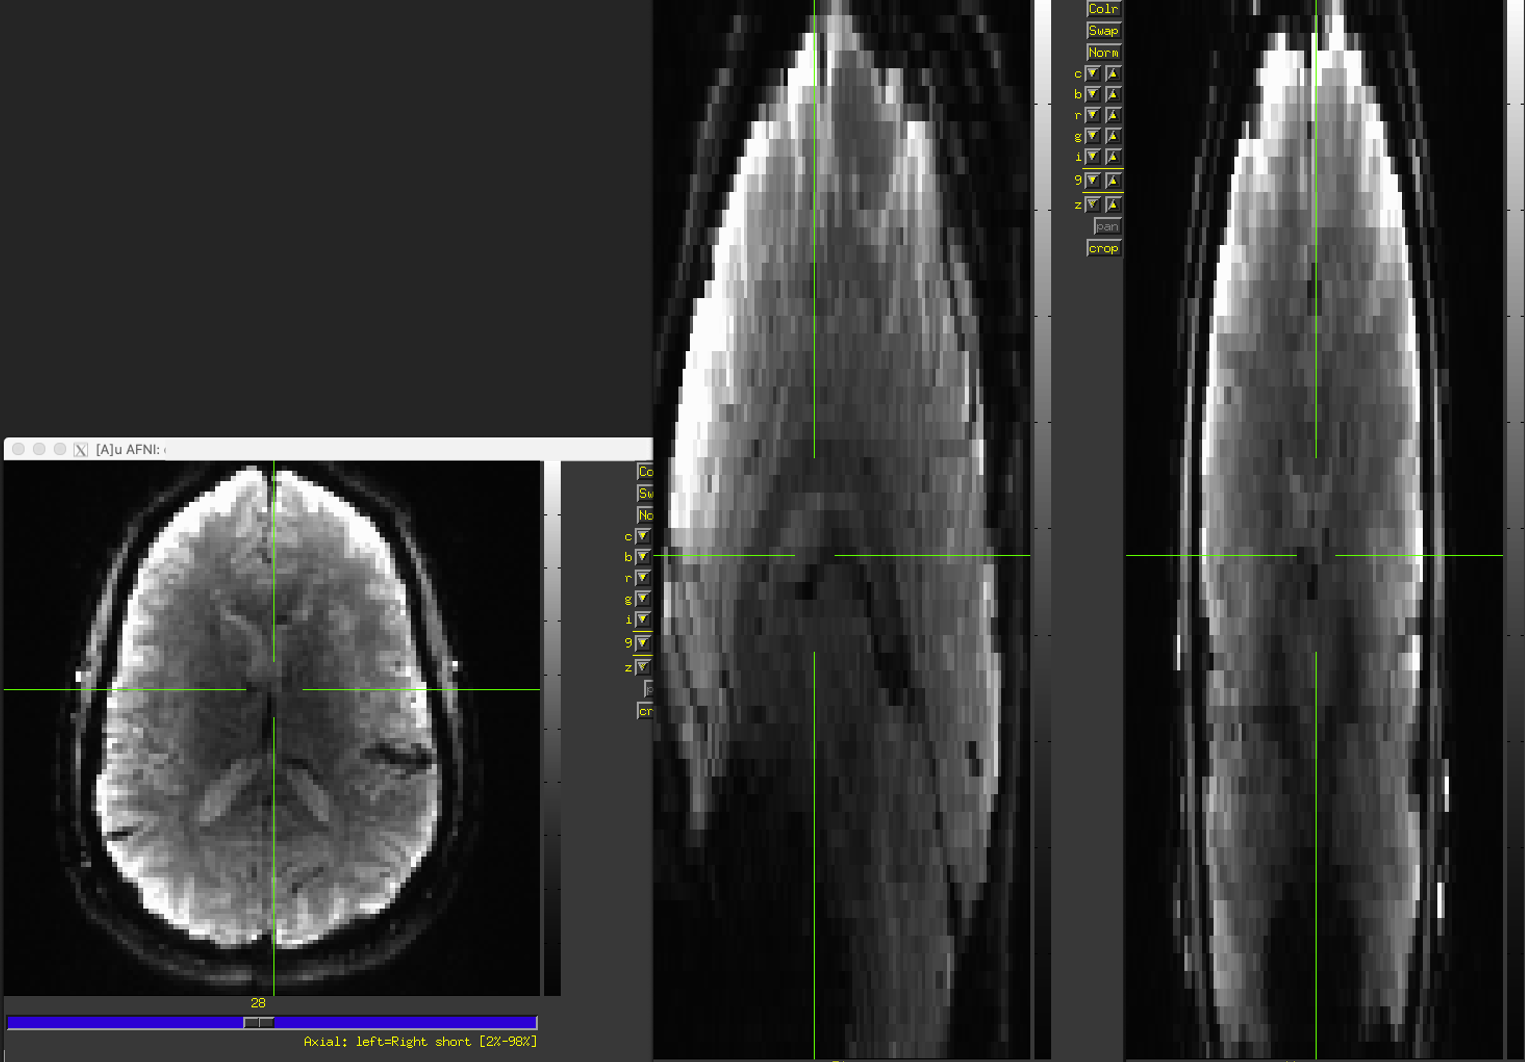
If the scan you rushed into does not have the exact same Rx as the scan you are sending to AWS for recon, the resulting data will look stretched or abnormal
What does it look like?
The most common deviation we see is a reconstructed dataset that is stretched in the z-direction (I-S)
You are expecting data that look like this:

Instead, they look like this:

How do I fix it?
During the reconstruction process, the Rx info is copied (using fslcpgeom) from your dicom file to the reconstructed imaging data
To fix this issue, all you need to do is repeat that process, using a dataset that has the correct Rx info
Identify the name of the affected “bad” recon
P1130_1135_39_Resting_State.7_mbrecon.nii.gz
Identify a recon (nii.gz) dataset that is NOT stretched or warped
P1130_1126_58_Resting_State.7_mbrecon.nii.gz
Make a copy of the “bad” nii.gz file for safe keeping
cp P1130_1135_39_Resting_State.7_mbrecon.nii.gz P1130_1135_39_Resting_State.7_mbrecon_STRETCHED.nii.gz
Copy the Rx info from the properly reconstructed “good” scan to the affected “bad” scan
fslcpgeom good bad

fslcpgeom P1130_1126_58_Resting_State.7_mbrecon.nii.gz P1130_1135_39_Resting_State.7_mbrecon.nii.gz
The resulting dataset will have the correct Rx info and can be used in further processing